Google Chrome extensions are programs that can be installed into Chrome in order to change the browser’s functionality. You can follow this document to build a chrome extension by using javascript & html.
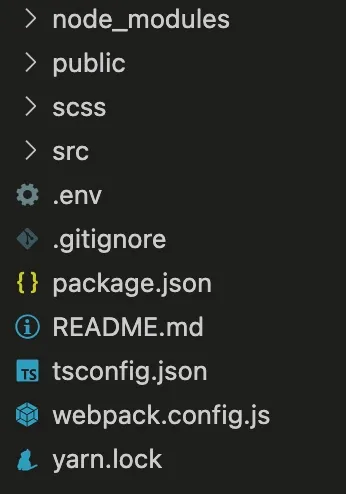
In this article, we’re going to show you how to build a chrome extension by using typescript. Following this artice, you will be able to understand the main workflow of an extension. First of all, we will introduce the extension project structure:

- src folder contains logic for the extension.
- scss folder contains style files.
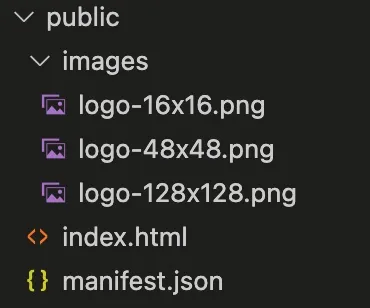
- public folder contains static files.
- .env is the environment file.
- webpack.config.js contains the logic to compile typescript to javascript.
Following the chrome extension document, you can see that an extension is created from some main parts: manifest.json file, html files, js files, images. Therefore, except js files, other parts should be called as static files & they need to be put in the public folder.

Firstly, you must install some packages to run the project. Follow the package.json file:
    // package.json
{
  "name": "typescript-chrome-extension",
  "version": "1.0.0",
  "description": "",
  "main": "index.js",
  "scripts": {
    "build": "webpack --mode production",
    "dev": "webpack --mode production --watch"
  },
  "author": "Olive Software",
  "license": "ISC",
  "devDependencies": {
    "@types/chrome": "^0.0.193",
    "@types/jquery": "^3.5.14",
    "browser-sync": "^2.27.10",
    "browser-sync-webpack-plugin": "^2.3.0",
    "copy-webpack-plugin": "^11.0.0",
    "css-loader": "^6.7.1",
    "mini-css-extract-plugin": "^2.6.1",
    "node-sass": "^7.0.1",
    "sass-loader": "^13.0.2",
    "ts-loader": "^9.3.1",
    "typescript": "^4.7.4",
    "webpack": "^5.73.0",
    "webpack-cli": "^4.10.0",
    "webpack-dev-server": "^4.9.3"
  },
  "dependencies": {
    "@types/lodash": "^4.14.183",
    "axios": "^0.27.2",
    "dotenv": "^16.0.1",
    "dotenv-webpack": "^8.0.1",
    "jquery": "^3.6.0",
    "lodash": "^4.17.21"
  }
}
    // webpack.config.js
const CopyPlugin = require('copy-webpack-plugin');
const MiniCssExtractPlugin = require('mini-css-extract-plugin');
const Dotenv = require('dotenv-webpack');

const path = require('path');
const outputPath = 'dist';
const entryPoints = {
    main: [
        path.resolve(__dirname, 'src', 'main.ts'),
        path.resolve(__dirname, 'scss', 'main.scss')
    ],
    background: path.resolve(__dirname, 'src', 'background.ts')
};

module.exports = {
    entry: entryPoints,
    output: {
        path: path.join(__dirname, outputPath),
        filename: '[name].js',
    },
    resolve: {
        extensions: ['.ts', '.js'],
    },
    module: {
        rules: [
            {
                test: /\.tsx?$/,
                loader: 'ts-loader',
                exclude: /node_modules/,
            },
            {
                test: /\.(sa|sc)ss$/,
                use: [
                    MiniCssExtractPlugin.loader,
                    'css-loader',
                    'sass-loader'
                ]
            },
            {
                test: /\.(jpg|jpeg|png|gif|woff|woff2|eot|ttf|svg)$/i,
                use: 'url-loader?limit=1024'
            }
        ],
    },
    plugins: [
        new CopyPlugin({
            patterns: [{ from: '.', to: '.', context: 'public' }]
        }),
        new MiniCssExtractPlugin({
            filename: '[name].css',
        }),
        new Dotenv(),
    ]
};
The next step, we will explain the config in the webpack.config.js file. As you can see, we use 3 libraries:
- copy-webpack-plugin is used to copy all static files inside public folder to the dist folder.
- mini-css-extract-plugin is used to compile scss & sass files to a single css file.
- dotenv-webpack is used to config environment file (.env)
- outputPath defines the build folder name.
- entryPoints defines the compiled file names. It means that webpack will compile 3 files src/main.ts, scss/main.scss, src/background.ts to dist/main.js, dist/main.css, dist/background.js
In this article, we will write the logic to collect all email addresses on a specific website. Another way of saying, the logic will detect the email address string inside the HTML DOM. The requirement should be when user clicks to the extension, a popup which contains “Find emails” button will be shown. User clicks to that button, the extension will show the list of detected emails or error message if the emails can not be found. We define the popup template like this:
    // index.html
<!DOCTYPE html>
<html>

<head>
    <link rel="stylesheet" href="main.css">
    <script type="text/javascript" src="main.js"></script>
</head>

<body>
    <div class="olive-extension">
        <button type="button" class="olive-extension__btn" id="olive-extension__btn">
            Find emails
        </button>

        <div class="olive-extension__email-table" id="olive-extension__email-table"></div>

        <h3 class="olive-extension__error-msg" id="olive-extension__error-msg"></h3>
    </div>
</body>

</html>
You can see that the compiled files (main.css & main.js) are linked to the html file. We don’t need to add the path because all compiled files & static files will be in the same dist folder.
    // manifest.json
{
    "name": "Olive Software - Typescript Chrome Extension",
    "description": "Detect the emails on a website",
    "version": "1.0.0",
    "manifest_version": 3,
    "icons": {
        "16": "/images/logo-16x16.png",
        "48": "/images/logo-48x48.png",
        "128": "/images/logo-128x128.png"
    },
    "permissions": [
        "activeTab",
        "scripting",
        "storage"
    ],
    "content_scripts": [
        {
            "matches": [
                "*://*/*"
            ],
            "js": [
                "main.js"
            ]
        }
    ],
    "action": {
        "default_popup": "index.html"
    },
    "background": {
        "service_worker": "background.js"
    }
}
In order to run the extension, we must define the manifest.json file that contains extension information.
- manifest_version
- icons contains the extension logo information.
- permissions defines the permissions that extension wants to access.
- content_scripts > matches defines the url patterns that you want the extension working on.
- content_scripts > js defines the logic file for the extension.
- default_popup defines the html template file.
- service_worker defines the running background file.
    // src/background.ts
chrome.runtime.onMessage.addListener((request, sender) => { });
    // src/main.ts
import $ from 'jquery';

class Main {
    constructor() {
        this.init();
    }

    init() {
        $(document).ready(async () => {
            this.resetEmailTable();
            this.hideErrorMessage();
            this.handleLoadEmails();
            this.handleData();
        });
    }

    hideErrorMessage() {
        if ($('#olive-extension__error-msg')[0]) {
            $('#olive-extension__error-msg').removeClass('olive-extension-showing').addClass('olive-extension-hidding');
            $('#olive-extension__error-msg').html();
        }
    }

    showErrorMessage(text: string) {
        if ($('#olive-extension__error-msg')[0]) {
            $('#olive-extension__error-msg').removeClass('olive-extension-hidding').addClass('olive-extension-showing');
            $('#olive-extension__error-msg').html(text);
        }
    }

    resetEmailTable() {
        if ($('#olive-extension__email-table')[0]) {
            $('#olive-extension__email-table').empty();
        }
    }

    validateEmail(email: string) {
        if (email && email !== '') {
            return email.match(
                /^(([^<>()[\]\\.,;:\s@\"]+(\.[^<>()[\]\\.,;:\s@\"]+)*)|(\".+\"))@((\[[0-9]{1,3}\.[0-9]{1,3}\.[0-9]{1,3}\.[0-9]{1,3}\])|(([a-zA-Z\-0-9]+\.)+[a-zA-Z]{2,}))$/
            );
        }

        return false;
    };

    handleLoadEmails() {
        const t = this;

        $(document).ready(() => {
            $('#olive-extension__btn').on('click', async () => {
                t.hideErrorMessage();

                const tabData = await chrome.tabs.query({ active: true, currentWindow: true });
                const tabId = tabData[0].id;

                const handleCurrentTab = () => {
                    const documentHtml = document.body.innerHTML;
                    const context = documentHtml.toString();
                    const emailsData = context.match(/([a-zA-Z0-9._-]+@[a-zA-Z0-9._-]+\.[a-zA-Z0-9._-]+)/gi);
                    const emails: string[] = [];

                    if (emailsData && emailsData.length) {
                        for (const item of emailsData) {
                            if (
                                !item.endsWith('.png') &&
                                !item.endsWith('.jpg') &&
                                !item.endsWith('.jpeg') &&
                                !item.endsWith('.gif') &&
                                !item.endsWith('.webp')
                            ) {
                                emails.push(item);
                            }
                        }
                    }

                    if (emails && emails.length) {
                        const temp: string[] = [];

                        let html = `
                            <table>
                                <thead>
                                    <tr>
                                        <th>Email</th>
                                    </tr>
                                </thead>

                                <tbody>
                        `;

                        for (const email of emails) {
                            if (!temp.includes(email)) {
                                temp.push(email);

                                html += `
                                    <tr>
                                        <td>${email}</td>
                                    </tr>
                                `;
                            }
                        }

                        html += `
                                </tbody>
                            </table>
                        `;

                        chrome.runtime.sendMessage(chrome.runtime.id, { type: 'EMAIL_TABLE_CONTENT', data: html });
                    } else {
                        chrome.runtime.sendMessage(chrome.runtime.id, { type: 'NO_EMAIL' });
                    }
                }

                if (tabId) {
                    chrome.scripting.executeScript({
                        target: { tabId },
                        func: handleCurrentTab,
                    })
                }
            });
        });
    }

    handleData() {
        chrome.runtime.onMessage.addListener((request, sender) => {
            if (request && request.type) {
                switch (request.type) {
                    case 'EMAIL_TABLE_CONTENT': {
                        $('#olive-extension__email-table').html(request.data);
                        break;
                    }
                    case 'NO_EMAIL': {
                        this.showErrorMessage('No email');
                        break;
                    }
                }
            }
        });
    }
}

new Main();
When user clicks to “Find emails” button, the extension has to access to the current active tab by using chrome.tabs.query({ active: true, currentWindow: true }). This function will return the active tab information and we can use the js logic with this active tab by running chrome.scripting.executeScript({ target: { tabId }, func: handleCurrentTab }). The handleCurrentTab function should contain the logic to detect the email address string in the html dom, because we will be able to get the active tab dom at this time.
In order to pass the result from the active tab logic to the extension logic, we can use the chrome.runtime.sendMessage function. chrome.runtime.onMessage.addListener will listen all sent messages and show the result or error message to the extension popup template for each specific case.
    // scss/main.scss
body {
    background: #fff;
    width: 300px;
    height: auto;
    font-family: "Roboto";
    margin: 0;
    padding: 1rem;
    .olive-extension {
        display: flex;
        flex-direction: column;
        align-items: center;
        justify-content: center;
        &__email-table {
            table {
                border: 1px solid #e3e3e3;
                thead {
                    tr {
                        th {
                            font-size: 0.8rem;
                            text-align: center;
                            border-bottom: none;
                            padding: 0.3rem;
                            background: #dcdcdc;
                        }
                    }
                }
                tbody {
                    tr {
                        td {
                            font-size: 0.8rem;
                            text-align: center;
                            padding: 0.6rem;
                        }
                    }
                }
            }
        }
        h3 {
            &.olive-extension__error-msg {
                margin: 0.2rem 0;
                padding: 0;
                font-size: 0.8rem;
                font-weight: 200;
                text-align: center;
                color: red;
            }
        }
        button {
            font-size: 0.8rem;
            margin-bottom: 1rem;
            width: 50%;
            border: none;
            color: #fff;
            height: 2rem;
            border-radius: 5px;
            cursor: pointer;
            &.olive-extension__btn {
                background: #007bff;
            }
        }
    }
}

.olive-extension-hidding {
    display: none !important;
}

.olive-extension-showing {
    display: block !important;
}
For now, we are already to use this extension. Run this command yarn build or npm run build to build the dist folder. When we already have the dist folder, open the chrome browser & run this link chrome://extensions/. From this link, you will be able to see all installed extensions.
You must change the mode to the developer mode that will allow you loading the extension from your local. Clicking the “Load unpacked” button to load the logic from dist folder. So now, the extension is already to use.
In the development time, you don’t need to rebuild the project many times, just need to run this command yarn dev or npm run dev. This command will watch any changes in the source code and rebuild the project automatically. At chrome://extensions/screen, you just need to click to the reload icon to load the updated extension.
Get the full source code at this Github link.
